Thursday, October 10, 2013

Trick Or Treat Thursday! 10/10

1. Krystal's pick:  Halloween Krispie Treats by Cupcake Diaries
2. Victoria's pick:  Candy corn cookies by Creative Destinations Guide
3. Randi's pick: The sorting hat by Practically Functional
4. Jessica's pick:  Monster apple bites by We Do Fun Here
5. Ashley's pick: Hand painted pumpkin crate by Anderson and Grant

Victoria Schilke - My Little Birds / Facebook / Pinterest
 If you were featured, feel free to grab the button and show it off!


<a href="http://www.sowderingbout.com/" rel="nofollow" title="sowderingabout"> <img src="https://blogger.googleusercontent.com/img/b/R29vZ2xl/AVvXsEi50TowdDOWDLtkFGph1hbIcVhIAllFC66GzmR4w7ytXguRngbN3gjokHAK0jID4Y_EIaE6g8hU_S_z9Cpz2np1LfdOJ8GZ-H-WhIsS-IeCJSm7vXrYzaEtu9PpqIrwYXeNK5A1uS4Ru3jG/s200/featured3+copy.jpg" width="200" height="200" alt="Trick or Treat Thursday" style="border:none;" /></a>


Party Button:

<a href="http://www.sowderingabout.com/" rel="nofollow" title="sowderingabout"> <img src="https://blogger.googleusercontent.com/img/b/R29vZ2xl/AVvXsEj_yNMohqUwM5noAOXXs_SZBPKmPOjfNr4-HpylMY6JTGEJpXcn38M0XHYdj7cniy_ihTV9QC2IgDf10b89M_9dIhWoIR592VxRj9Uuf0KXYBEbhXKfBKsF4-W0zOJvGMjxOKHtQ51IpmwC/s200/newbutton+copy.jpg" width="200" height="200" alt="Trick or Treat Thursday" style="border:none;" /></a>


Please read and follow the rules before adding your link.
1. You may link up as many projects as you would like.  They need to be YOUR creations and projects.
2. Link directly to your post and NOT to your main blog.
3. Please no giveaways, promotions, items for sale, roundups, or posts that do not belong to you.
4. Please make sure to click and check out the other projects linked up!

*By submitting your link you are authorizing me to post your projects and pictures as a feature and on various social media websites along with links to your post. I have the right to delete links that do not adhere to the rules.


Wednesday, October 2, 2013

Trick Or Treat Thursday! A Blog Link-Up


 October. It's here. FINALLY. I've always loved October and the fall. Think crisp weather, apple orchards, Halloween, my birthday ;) Definitely the best month of the year.

 This year, since we are in our own place now, I decided that I wanted to actively decorate for the holidays! It never felt right anywhere else, but here it feels right. So I teamed up with a few other bloggers to get together the Trick Or Treat Thursday blog hop! Feel free to link up with us and share your projects!

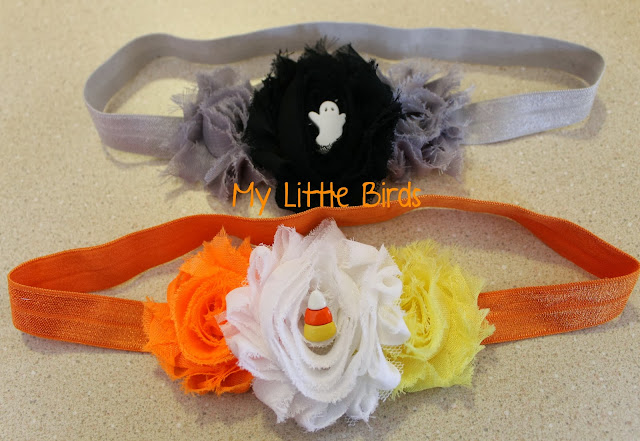
To kick things off, I decided to make my daughter's Halloween headbands. Basically translates to, I have a one month old, and a 20 month old, and I don't have time to sit and do anything elaborate until my husband gets home form work, and I creep down to the craft nook with a bottle of wine.

My flowers and elastic was ordered from http://www.sunshineshoppesupply.com, and the little buttons were purchased at Hobby Lobby!

First was pulling out my supply basket.

 You can probably tell from my variety that I definitely had the holidays in mind when planning on making fun headbands. I chose my colors and pieces and put the rest away. After that I took the elastic and figured out how large my daughter's noggin was, and cut a few pieces to that length (this way I can just use the others later on without having to measure again)

I busted out the hot glue gun to glue the ends together and make the loop. After that I cut out my flowers, and figured out my layout. I got felt circles, and hot glued everything in place onto those. Once it was dry I went ahead and glued the felt circles onto the elastic and let the whole thing dry again!

Then of course comes the finished product! And I love how they turned out. Of course what headband would be complete without a little model?!


Once you have the supplies, this project is super easy, and not at all time consuming. I'm glad I went about making my own, instead of purchasing premade ones!

Please be sure to visit and follow your hosts in order to not miss any Halloween fun! Check out the projects and link up with us!
Randi at Sowdering About

Krystal at My Life Of Travels & Adventures

Ashley at My Craftily Ever After


If you were featured, feel free to grab the button and show it off!


<a href="http://www.sowderingbout.com/" rel="nofollow" title="sowderingabout"> <img src="https://blogger.googleusercontent.com/img/b/R29vZ2xl/AVvXsEi50TowdDOWDLtkFGph1hbIcVhIAllFC66GzmR4w7ytXguRngbN3gjokHAK0jID4Y_EIaE6g8hU_S_z9Cpz2np1LfdOJ8GZ-H-WhIsS-IeCJSm7vXrYzaEtu9PpqIrwYXeNK5A1uS4Ru3jG/s200/featured3+copy.jpg" width="200" height="200" alt="Trick or Treat Thursday" style="border:none;" /></a>


Party Button:

<a href="http://www.sowderingabout.com/" rel="nofollow" title="sowderingabout"> <img src="https://blogger.googleusercontent.com/img/b/R29vZ2xl/AVvXsEj_yNMohqUwM5noAOXXs_SZBPKmPOjfNr4-HpylMY6JTGEJpXcn38M0XHYdj7cniy_ihTV9QC2IgDf10b89M_9dIhWoIR592VxRj9Uuf0KXYBEbhXKfBKsF4-W0zOJvGMjxOKHtQ51IpmwC/s200/newbutton+copy.jpg" width="200" height="200" alt="Trick or Treat Thursday" style="border:none;" /></a>


Please read and follow the rules before adding your link.
1. You may link up as many projects as you would like.  They need to be YOUR creations and projects.
2. Link directly to your post and NOT to your main blog.
3. Please no giveaways, promotions, items for sale, roundups, or posts that do not belong to you.
4. Please make sure to click and check out the other projects linked up!

*By submitting your link you are authorizing me to post your projects and pictures as a feature and on various social media websites along with links to your post. I have the right to delete links that do not adhere to the rules.


Sunday, September 22, 2013

2 Under 2. The Saga Begins!


Our family of 3 is now a family of 4! Sorry for the late update, but life has been hectic since the arrival of our beautiful little man! Ian came into this world via repeat c/s on 9/3/2013 at 7:56 AM. He weighed in at 7 lbs 1 oz, and is 19.5 inches long. He is an eating machine and has been packing on the weight, so he's now up to 7 lbs 8 oz.  We love him very much, and big sister seems pretty excited to have a baby around!

Saturday, August 31, 2013

Ian Seamus - The Big Nursery Reveal!

It's finally done. The nursery is complete, and not a moment too soon, since he will be here 9/3 at the very latest!

Remember this room?


It is now, THIS! :)


Just a few more days now until I can hold my little man in my arms and welcome him to the world!

Thursday, August 29, 2013

Nursery Name Wall Decor!

I'm a firm believer that every nursery needs at least one or two things with the child's name in/on them. And with our underwater theme, I figured what better way to do that then with an OAR!


So I went to Cabela's (definitely not my scene!) and purchased a small oar for $15, and then went to the craft store and purchased a package of small knobs to glue onto said oar after it was all painted to my liking. (re: once my husband painted and didn't miss a spot!)


Then I purchased unfinished wood letters from Hobby Lobby and painted those white as well, so they had a good base going.

It only took one coat of paint for the letters, but I believe we did 2 or 3 coats on the oar and the knobs just to make sure coverage was there!

After the paint dried on the letters, I traced them onto scrapbook paper, and cut them out. After that, I used Mod Podge to adhere them to the wooden letters like so.
Next was finding a way to get them to hang off the knobs! I figured ribbon was the simplest solution in this situation, so I used super glue to stick the ribbons to the back of each letter (be careful to make sure the ribbons are the same length or else the letters will not hang evenly)


Now that we got this far, I realized I had no idea how I was going to put the actual oar on the wall. If it doesn't require glue, scissors, glitter, or a paintbrush, this is where I recruit the help of my trusty husband, who came up with a solution I like to call "TEETH!"


Then a quick test shot to make sure the letters hang evenly....
Close enough for my liking! Then came time to hang the oar on the wall, and with that! Ian's nursery is now complete. 


Linking Up To:

startathome On Display Monday


Wednesday, August 21, 2013

Kid's Summer Craft Camp, and my First Guest Post!

I recently completed my first guest post over at Sowdering about in Seattle, as a part of Randi's Kids Summer Craft Camp series!

 I've always loved taking something old and seemingly useless, that would just wind up in the trash, and turning it into something not only functional, but adorable!


Click HERE to see what project we completed! As well as check out all the other amazing and fun, kid-friendly crafty goodness created by others around the blogosphere!

Tuesday, August 13, 2013

Enchiladas

Family Circle Magazine has always been one of my favorites. Great recipes, great articles, and fun projects to do with varying age groups! My subscription showed up the other day, and on the cover I saw the most amazing looking enchiladas, and I knew I had to make them. That night. So I jammed the magazine into my purse, and headed to my local Meijer store for ingredients.

Click here for the recipe!


First step was to make shredded chicken. I always do this in the crock pot because it's easy and I can do other things while it's cooking. So I put 4 boneless skinless chicken breasts in the crock pot on high for 4 hours. And shredded the results.
I sprayed my casserole dish with non-stick cooking spray and poured in a small layer of enchilada sauce. Then mixed the rest of the enchilada sauce into the chicken, along with the shredded cheese. 
Then the neufchatel cheese was spread on the tortillas, filled with the meat/cheese mixture, and then the tortilla was rolled up and placed in the baking dish!
Cover the enchiladas with the remaining cheese, and bake at 375 for 20 minutes, and then 400 degrees for 5 minutes.

 Garnish with whatever you want. I used jalapeno peppers because I love them!

Cut out your piece, and enjoy! 

Thursday, July 18, 2013

Another Step Closer to Crafting My Heart Out


Since we moved, most of the non-necessities have been living in boxes. This includes the bulk of my crafting items, which means that mama can't play! We decided to use a little nook in the basement as my "craft area". The rest of the basement is going to be set up as a playroom for the childrens. Naturally I needed a surface to work on if I were going to have a craft setup, so off to my favorite thrift store I went. And came home with this gem. Only $14.41! I liked the detailing on the bottom of the table, and figured it would be the perfect table to love, and use and abuse simultaneously.


So, I bought it, brought it home, and asked Scott if he could make it prettier. Of course he agreed, since I'm pregnant, and pregnant ladies shouldn't be playing around with paint fumes ;)

So the yucko, chipped, blue paint was covered with a couple coats of white.

Here it is, in it's new home in the "craft nook"


 After the bottom was taken care of, it was time to make the top look nicer without putting too much work into it. So I picked out a sample paint color that I liked, bought a can, and WHAM! 3 coats later, table is finished :)

And then we replaced the table top, and once again, put the table in it's rightful new home.

Paired it with an old chair (also thrifted) for $5

The first step of completing the basement! Hallllllllelujiah!

I also was in the market for 2 more small, wooden, child size chairs to refurbish, to put with the set we already have down in the play area. Instead I lucked out and found 2 matching, perfect condition chairs with the seat the same height as the current ones, for $3 each!

So while there is no project there, WHAT A DEAL. Coloring table can now seat 4 beebs!


startathome.blogspot.com
My Button